I just received the new Wunderlich F800GS/F650GS Tank Bag from Wunderlich America. I've been waiting since I got the bike in November for this bag and it finally came in. I even paid a bit less than I expected. Here's a few photos of some details that can't be seen from the Wunderlich publicity shots on the web:.jpg) This is a photo of the whole bag, assembled and ready to go on the bike--front on the left, rear to the right. It's rather big--larger than I thought. That's actually alright by me, as I like a big tank bag. The sheet of paper I have in the map holder is the 8 1/2" by 11" installation instructions. The map pocket unzips 180 degrees to allow for easy insertion of maps. It's also clear on both sides, so you can easily flip it over and re-fasten to the bag to see the other side of the map. Way cool.
This is a photo of the whole bag, assembled and ready to go on the bike--front on the left, rear to the right. It's rather big--larger than I thought. That's actually alright by me, as I like a big tank bag. The sheet of paper I have in the map holder is the 8 1/2" by 11" installation instructions. The map pocket unzips 180 degrees to allow for easy insertion of maps. It's also clear on both sides, so you can easily flip it over and re-fasten to the bag to see the other side of the map. Way cool..jpg)
This shows the front of the bag with the strap that goes around the front of the bike frame easily seen. You can see a handle, with "Wunderlich" sewn into it. The handle is very nicely padded. The zipper above the right strap has an audio cable access port behind it..jpg)
Here's the rear of the bag--the end that sits next to the rider. You can see the two straps that feed under the seat and attach to two slots on the bike. One of the main reasons I wanted this bag is that I can't stand long straps flopping in the wind. These are completely hidden from view once the seat is in place..jpg)
Here's the bottom of the bag and attached mounting "plate". This appears to be a slick vinyl that I'm sure is supposed to reduce scratches. Front on top, back on bottom..jpg) Here I've taken the mounting plate off and the bag is on it's side. Front to the right and back to the left. You can easily see the padded handle. Even though most of the bottom of the bag will not touch the bike, it still has the vinyl surface. The funky flap sticking out is used to affix the bag to the mounting "plate". It slides into pockets in the mount and then clips into the front of the bag.
Here I've taken the mounting plate off and the bag is on it's side. Front to the right and back to the left. You can easily see the padded handle. Even though most of the bottom of the bag will not touch the bike, it still has the vinyl surface. The funky flap sticking out is used to affix the bag to the mounting "plate". It slides into pockets in the mount and then clips into the front of the bag..jpg)
This is the mount, lying top up, front to the left. You can see the "pocket" that the flap slides into. It's rather a nifty design, I think..jpg)
OK. Here's the bag opened up. You can see the removable accessory bag slid into the flap on the lid. Also nifty..jpg)
Here's a somewhat blurry (sorry) shot of the accessory bag taken out of the lid. It can easily be removed and taken with you if needed..jpg)
Here's an interior photo of the front left corner of the bag. Yup. It sure is blue... You can see the audio cable port I mentioned earlier along with a mysterious zipper to access yet another pocket..jpg)
Unzipping the interior pocket reveals a very flat space, perhaps to store papers and documents, with a thin plastic stiffener. Looks removable if you don't want the bag to have stiff sides..jpg) I think the map pocket is as well designed as it could be. It is opened by a zipper, which has that "waterproof" rubber cover. Very easy to load and move the paper around. As to the attachment, it won't budge once it's all strapped up. There's a long Velcro attachment in the front, a clip in the back, as well as four attachments on the side as you can see from these photos.
I think the map pocket is as well designed as it could be. It is opened by a zipper, which has that "waterproof" rubber cover. Very easy to load and move the paper around. As to the attachment, it won't budge once it's all strapped up. There's a long Velcro attachment in the front, a clip in the back, as well as four attachments on the side as you can see from these photos..jpg) Lastly, the bag unzips around the circumference to expand upwards quite a ways. Because I don't have anything in it, it's rather scrunched down, but I would estimate it is twice the volume when expanded. You can also see the double-sided nature of the map pocket, which can be easily detached from the rear of the bag. This allows access to the space underneath.
Lastly, the bag unzips around the circumference to expand upwards quite a ways. Because I don't have anything in it, it's rather scrunched down, but I would estimate it is twice the volume when expanded. You can also see the double-sided nature of the map pocket, which can be easily detached from the rear of the bag. This allows access to the space underneath.
All in all, I am very, very satisfied with this bag. Of course, I feel that way about all the Wunderlich farkles I've bought over the years. I think the quality, design, and price of this bag is better than the TouraTech bag I had with my F650GS Dakar. The letter "W" may come late in the alphabet, but it beats "TT" this time.
I got home, stepped out of the car, and immediately installed the tank bag. Here you go:.jpg) This is the under-seat fastening. You can see the two straps from the mounting plate that attach to the existing plastic loops on the bike. This is so straightforward that I can't understand why other bag manufacturers don't use the same method. The middle strap is used to attach the bag to the mount later on. You'll see that in a later picture.
This is the under-seat fastening. You can see the two straps from the mounting plate that attach to the existing plastic loops on the bike. This is so straightforward that I can't understand why other bag manufacturers don't use the same method. The middle strap is used to attach the bag to the mount later on. You'll see that in a later picture..jpg)
You can see how tight the mount fits to the seat. I like it!.jpg)
Here's how tight the front of the mount fits. Not much room for the key. Again, you'll see more detail on this in a later photo..jpg) Here's the bag on the bike. Very secure and easy to mount. It turns out Wunderlich has designed two separate ways to fasten the bag to the mount. The easiest way is to just clip it on. Goes on and off in seconds. However, in my opinion, it's so easy to take off that I'd be afraid it'd get stolen. So, I used the more secure method that holds down all four corners of the bag using Velcro straps sewn into the mounting plate routed through D-rings sewn onto the bag. As we've seen, the two lower straps go under the seat (I didn't get a good picture of the D-rings here) and cannot be removed without getting under the saddle, which, of course, is locked. This seems much more secure to me.
Here's the bag on the bike. Very secure and easy to mount. It turns out Wunderlich has designed two separate ways to fasten the bag to the mount. The easiest way is to just clip it on. Goes on and off in seconds. However, in my opinion, it's so easy to take off that I'd be afraid it'd get stolen. So, I used the more secure method that holds down all four corners of the bag using Velcro straps sewn into the mounting plate routed through D-rings sewn onto the bag. As we've seen, the two lower straps go under the seat (I didn't get a good picture of the D-rings here) and cannot be removed without getting under the saddle, which, of course, is locked. This seems much more secure to me..jpg)
Other side of the bike. I think it looks good..jpg) A closer shot from the same angle. You can see how the center strap at the back of the mount runs up and locks the bag onto the mount. If I hadn't used the D-ring method, this would be all that holds down the rear of the bag.
A closer shot from the same angle. You can see how the center strap at the back of the mount runs up and locks the bag onto the mount. If I hadn't used the D-ring method, this would be all that holds down the rear of the bag..jpg) Here's a close-up of the front mount. You can see the straps on both side holding the D-rings tight. This bag is going nowhere! The center clip is shown as well. Without the D-ring method, this is all that holds the bag on.
Here's a close-up of the front mount. You can see the straps on both side holding the D-rings tight. This bag is going nowhere! The center clip is shown as well. Without the D-ring method, this is all that holds the bag on. .jpg) Yet another close-up of the key area. Yes, the power port will open...just barely. This is real tight in here. I've been using a key ring with two other motorcycle keys and one of those pocket-sized garage door openers. No longer. All this will fit, again just barely, but it's a hassle to turn the key. I'll have to pare down my key ring.
Yet another close-up of the key area. Yes, the power port will open...just barely. This is real tight in here. I've been using a key ring with two other motorcycle keys and one of those pocket-sized garage door openers. No longer. All this will fit, again just barely, but it's a hassle to turn the key. I'll have to pare down my key ring..jpg) You might wonder how it feels standing on the pegs. Well, if I had any shorter legs, I'd be hitting this bag right where it'd hurt. As it is, the bag hits my thighs just under my crotch if I lean just the slightest bit forward while standing up. It doesn't bother me, but I'm not all that active while standing.
You might wonder how it feels standing on the pegs. Well, if I had any shorter legs, I'd be hitting this bag right where it'd hurt. As it is, the bag hits my thighs just under my crotch if I lean just the slightest bit forward while standing up. It doesn't bother me, but I'm not all that active while standing.
As always, your mileage may vary...
Thursday, March 26, 2009
Wunderlich F800GS/F650GS Tank Bag
Labels:
Motorcycles
![]()
Friday, March 13, 2009
Took the Long Way To Work
.jpg) I took the long way to work this morning, with a little swing out on the farmland flats to the west of town.
I took the long way to work this morning, with a little swing out on the farmland flats to the west of town.
I've been commuting on the new F800GS pretty frequently since it's purchase last November. Only when the roads are iced up do I drive the car. I've been surprised at how little the temperature bothers me; I rode in one morning and noticed that the temperature was 7.7° at one point. I was glad my commute is only 20 miles that morning, though.
Today it was a balmy 27° and felt fine. It sure was nice to enjoy the early morning farm roads.
Labels:
Commuting,
Motorcycle Trips
![]()
Thursday, March 12, 2009
Airguns
 In fact, I just got done with shooting 120 shots from my air pistol (FWB 103) on the 10 meter range.
Just to give you some idea, I shot a 541 and a 547 (out of 600 possible) for the two 60-shot strings this evening. This isn't too shabby, if I do say so myself, though not as good as the big boys that compete internationally (generally in the 570-590 range). The worst Olympic competitors (from countries like the Bahamas, Bahrain, or the Virgin Islands) regularly shoot about as well as my personal best of 563. The world record is 593.
Most air rifles that regular folk think of as accurate are likely to be fine guns. Most of them are excellent plinkers and good for backyard target shooting, but nowhere near being in the same league as what the big boys (read Olympic and World Cup level) shoot. Most of the rifles people think of as accurate will shoot in the neighborhood of 1 inch to maybe 1/2 inch groups at 10 meters. A few might even hit 1/4 inch groups in the hands of a really skilled shooter. As a comparison, high-end target air rifles have accuracies of about 1 mm groups, or .04 inches. Remember, the "10 ring" of a 10 meter air rifle target is actually a dot smaller than the head of a pin, and an Olympic caliber shooter will hit 58, 59 or 60 shots out of a 60 shot match directly on that dot. Many top level shooters have shot perfect scores: 600 out of 600 possible.
 What if you want to get into air rifle target shooting with a budget? There are some entry-level target rifles for as little as $350, such as the Daisy 753, but these have really awful triggers and you'll soon outgrow their inherent inaccuracies. If this is all the money you have, though, they'll get you started.
 You're going to have to about double the $350 for anything that you can really compete with, and at $600-$700 it will be an older, used (but not abused), spring gun like the discontinued FWB 300S, that was state-of-the-art in the '80s. A good shooter can still shoot respectable scores with a 300S, though likely not compete in anything higher than the state or regional level. I own one of these guns and compete in local matches against fellows with the latest and greatest rifles. Now, keep in mind, I'm primarily a pistol shooter, and am not as skilled with a rifle, but as long as I do my part, this rifle will shoot tens all day long. Trouble is, I can't shoot that well. A spring gun is just as accurate as the newer styles, but is considerably less forgiving of shooter error. If the shooter screws up in the slightest, the shot will go wide, every time.
 If you want to shoot with the big boys, you need an SSP (single-stroke-pneumatic) like the recently discontinued FWB 600 series (expect to spend $800-$1500 depending on condition) or, better yet, a PCP (precharged pneumatic).
 PCP guns like this FWB 700 will run you $1500 used up to $2500 new. Plus, you'll need either a high-pressure hand pump (think 2000-3000 psi) or a scuba tank to refill the gun every 200-300 shots or so. Both SSP and PCP guns are much more forgiving of bad shots than are springers. If the shooter throws a bad shot, it likely will go wide, but not always. Even one time in ten of not pulling a bad shot is enough to make a huge difference in match scores.
No top level shooters use spring guns anymore. The SSP guns are every bit as accurate and forgiving as the PCP's, but do require you to pump the gun one time before each shot. If you're shooting kneeling or, worse yet, prone, this is a real pain. Most air rifle events are standing only, though. The PCP rifles, by not needing a pump before every shot, also require less energy from the shooter, and thus you're less tired as the match wears on. All Olympic level shooters use PCP guns now.
You can see I'm an FWB (Feinwerkbau) fan. These are very fine German airguns that compete at the very highest levels. Anschutz makes equally fine rifles. Walther and Steyr also make top-quality rifles, though you won't see many at the Olympic or World Cup level. To be honest, there's not a whole lot of difference between these guns at this high level of quality and accuracy. It mostly comes down to which particular features you find desirable and how the rifle feels when you shoot it. The one that is the most accurate on any given day depends on who is shooting well, not the rifle itself.
If you want information from the experts themselves, get yourself to the TargetTalk forum at http://targettalk.org/. The guys, and a few girls, on that forum know all there is to know about target shooting, both air and smallbore (.22LR).
Air target shooting is surprisingly inexpensive, when you think about it. Any ol' Joe and go out and buy the very same equipment that the Olympic medalists shoot for about $5000 dollars ($2500 for the rifle and an equal amount for the clothing, air source, etc.). If you're on a budget, pick up a used FWB 300S from the TargetTalk forum's "For Sale" area for around $700 and begin with that. Even the most high quality pellets cost about $10-$15 per tin of 500 shots so ammunition is very cheap. Once you have the rifle and gear, the ongoing costs are very, very low.

Air pistol shooting, on the other hand, is even cheaper as all the expensive rifle clothing is outlawed by rule. All you need is a pistol and, if necessary, an air source. This will set you back between about $600-$2500 (depending on new/used, springer, SSP or PCP--just like the rifles) and a tin or two of pellets. By rule, you must shoot in street clothes and regular shoes, so no expense there. The absolute cheapest pistol I'd recommend is the Gamo Compact; it runs about $250, and is a SSP style. I have one of those for when visitors or friends want to shoot with me. It can shoot acceptably well and would be a good starter pistol. The trigger is actually pretty nice for that price range.
 If you can step up to $350, look at an IZH-46M. It is also a SSP design. It's easily twice the pistol the Gamo is at only $100 more. I started air pistol shooting with this gun.
 A fine example of PCP pistols is the FWB P44. It will run you about $1900, though.
Having said all this, be prepared to spend many, many, many hours practicing how to stand absolutely stock still. To my knowledge, shooting is the only Olympic sport that gives a gold medal to the competitor who can move the absolute least.
Any questions, just ask...
Labels:
Airguns
![]()
Friday, December 05, 2008
New BMW at the 'rastus house
 My last post, lo this many months ago, announced the TW200's arrival.
Well, I finally went and got rid of the BMW F650GS Dakar like I said I would...only I traded it in on a new BMW F800GS.
What'a ya' know? I just couldn't go without a nice BMW in the house.
Labels:
Motorcycles
![]()
Wednesday, April 09, 2008
I've been traveling too fast lately
.jpg) As it turns out, the BMW is too big and too fast for what I really wanted to use it for. It's great on the road, but I want something for slow, off-road exploring.
As it turns out, the BMW is too big and too fast for what I really wanted to use it for. It's great on the road, but I want something for slow, off-road exploring.
I've found this Yamaha TW200. It costs less than half as much as the F650GS Dakar and was purchased yesterday new from the dealer. Notice the fat wheels; they make for a much more sure-footed off-road ride. Since this is a 200cc machine with about 16 horsepower, it's much less powerful than the 50 horsepower BMW. Also, and not insignificantly, the TW200 weighs over 150 pounds less than the BMW when fully tanked up.
Now I'm ready to go exploring all the places the BMW is unable to comfortably get to.
Labels:
Motorcycles
![]()
Sunday, October 07, 2007
What to Ride
.jpg) Well...there's another two-wheeled vehicle at the 'rastus house. I've wanted a BMW F650GS Dakar for some time now, but didn't think I would buy one, especially since BMW halted imports of the Dakar into the USA several months ago. I was very happy to find a local rider with one for sale last week. It's a 2007 model with less than 2000 miles on it, in perfect shape, and the price was very nice; I couldn't pass it up. I took several hours off from work Monday and drove it down from the big city.
Well...there's another two-wheeled vehicle at the 'rastus house. I've wanted a BMW F650GS Dakar for some time now, but didn't think I would buy one, especially since BMW halted imports of the Dakar into the USA several months ago. I was very happy to find a local rider with one for sale last week. It's a 2007 model with less than 2000 miles on it, in perfect shape, and the price was very nice; I couldn't pass it up. I took several hours off from work Monday and drove it down from the big city..jpg) Now, keep in mind that, as dual-sport motorcycles go, it's not the largest nor the fastest by a long shot; I still travel slowly, but to a lot more places than I did before. These photos were taken at the top of a local mountain this morning, accessible only by a long, steep, and rocky dirt road. There is no way I could have made this ride on a scooter, though I have been here plenty of times before on a mountain bike. Today I did not have the time to ride the bicycle, nor, frankly, am I in decent-enough shape to enjoy the climb.
Now, keep in mind that, as dual-sport motorcycles go, it's not the largest nor the fastest by a long shot; I still travel slowly, but to a lot more places than I did before. These photos were taken at the top of a local mountain this morning, accessible only by a long, steep, and rocky dirt road. There is no way I could have made this ride on a scooter, though I have been here plenty of times before on a mountain bike. Today I did not have the time to ride the bicycle, nor, frankly, am I in decent-enough shape to enjoy the climb.
However, on the new BMW, it was a pleasure indeed. I enjoyed the cool, crisp morning and the lack of fellow travelers on the way up. I had no trouble handling the bike even at slow speeds and on sketchy surfaces. I'm very happy; the Dakar is exactly what I'd hoped it'd be.
Labels:
Motorcycle Trips,
Motorcycles
![]()
Saturday, September 29, 2007
Where to Ride
 I got up early today and headed to the local Chevron station for my weekly fuel stop before the rest of the family got out of bed. I was hoping to beat the predicted rain, but didn't make it--down the water came. Luckily, I was wearing my fine Olympia Motor Sports AST jacket; it didn't leak a drop all morning even though I didn't have the liner in. This sure is a nice jacket. I like all the pockets and it's super-bright hi-viz yellow color. I did stop to slip a plastic bag over the GTV's leather saddle, though.
After the fill-up, I headed west to the flatland. After a short expedition to find a geocache by the entrance to a tight tunnel under the freeway, I spied a short road heading along the railroad tracks that I'd never been on. Needless to say, off I went..jpg) I spied this old service station under the gray clouds. It's been many decades since anyone filled up with either premium oil or gas from this place, but I'm sure it was rockin' in it's day.
I spied this old service station under the gray clouds. It's been many decades since anyone filled up with either premium oil or gas from this place, but I'm sure it was rockin' in it's day.
I headed more or less homeward after this detour, and got caught in more rain. Did I mention how much i like the AST jacket? Yea, I think I did. I suppose I'll have to do a write-up on it as well, huh?
Labels:
Equipment,
Scooter Trips
![]()
Tuesday, September 25, 2007
Where Not to Ride, Part II
.jpg) Yes, I know it's been more than a month since my last entry. I've been scootin' faithfully to work and back at least four times a week and take occasional trips on weekends; I obviously haven't taken the time to blog, though.
Yes, I know it's been more than a month since my last entry. I've been scootin' faithfully to work and back at least four times a week and take occasional trips on weekends; I obviously haven't taken the time to blog, though.
This past Saturday, I took the middle child out for a short spin. We came upon another friendly reminder that we live in what's still the Wild West for some folks. We tried to be extra careful around this place, as we figured the sign poster wouldn't have much trouble spotting us in our bright riding gear. If you look closely, you can see my reflection in his glasses; I have the matching jacket. The jacket my boy is wearing is actually my wife's, and thus the women's cut (shhh...don't tell him that, or I'll not be able to get it on him next time).
I'll do a write-up/review on these Olympia Moto Sports Airglide 2 riding jackets and pants soon.
Labels:
Equipment,
Scooter Trips,
Scooters
![]()
Friday, August 17, 2007
da Vinci Tandems
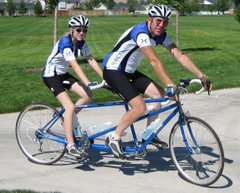
I've been a serious cyclist for about 30 years now, with most of my miles on the road but significant mountain bike time several years ago. Up until a few years ago, I'd only ridden a tandem bicycle a few times; being a paid bike wrench for over 10 years as a youth gave me several opportunities. Only one ride was for more than 20 miles...and that was more than 25 years ago.
 I bought this 26"-wheeled 1998 da Vinci Joint Venture early in 2004 and joined the tandem community. Since then, I've had about 4000 miles on two different da Vinci tandems with several different stokers, mostly my three children who are currently 8, 11, and 13 years old. The two adults I rode with were absolute novice cyclists, one being blind. Therefore, I have some experience with the da Vinci system, but not with an experienced adult stoker, and that might make a difference...see below.
 .jpg) We sold that first tandem to a family on the East Coast and bought a custom-ordered 700c-wheeled da Vinci in early 2006.
We sold that first tandem to a family on the East Coast and bought a custom-ordered 700c-wheeled da Vinci in early 2006.
I've discovered several things about the unique da Vinci drivetrain system: first, it's great with kids. They can coast when they want, push when they want, and when I'm really spinning, I don't pull their feet out of their shoes. We almost never ride with our cranks in sync...if we do, it's by chance. On the other hand, I've never missed it either. 99% of our climbing is done in the saddle. In fact, I only stand up to give the ol' butt a break occasionally. My stoker kids stand up all the time (sometimes too often) to take butt breaks. It seems like they always stop pedaling right at the steepest sections. But when it comes to ease of adaption to the whole tandem thing, the ICS (Independant Coasting System) gives us quite a bit of flexibility. It's at it's best with kids and inexperienced adults in the back. That's not to say it won't work for old-hand cyclists either; I just have no experience with it in that regard. As a captain, I love it. I wouldn't trade the ICS for anything.
The four chainrings are also very cool. Because the two crank chainrings are 34 teeth while the intermediate freewheels are about half that size, the whole middle jackshaft assembly spins twice as fast as the cranks. This means that the chainrings only need to be half the size of "normal" rings to give the same gearing. Very cool. This means that the 12-18-24-30 front chainrings are equal to 24-36-48-60 standard rings. Because they're so small, they never get caught up in anything...like while loading into the van, etc. They shift faster and easier than any triple I've ever ridden; this is to be expected, since they're actually Shimano HyperGlide cogs!! And the gear range is absolutely HUGE!! I'm currently running a 12x28 10-speed rear that gives us a 23 to 135 inch range from lowest to highest. You never need to worry about running out of top end...not with that 60x12 top gear.
And the 24 equivalent smallest ring, with a 28 or 30 big cog on the back end is plenty low for us. In fact, it's not the lack of low gears that bother me, it's my own steering problem keeping the bike straight and not wandering all over the road at speeds under 2.5 mph that limit our steep uphill creeping speed. Not many other 40-speed bikes out there either.
The 26" wheels we had on the first da Vinci are no big deal. I found a nice tire from Soma that's 1.1" wide and only 230 grams. At 110 PSI it rides very well. We're only 235-255 lbs depending on which kid stokes, so we're a very lightweight team. For heavier pairs, there's lots of quality 26" tires to choose from. The big knock on 26" road tandems is the lack of top end. Again, a 60x12 takes care of that just fine...
However, I prefer the 700c wheels we have on the latest tandem. There's plenty of tire selection and they just seem faster. I don't think they are; our average speed is about the same. I'm sure it's a psychological thing...
I expected some sort of weight penalty when I bought into the da Vinci drivetrain, and I'm sure there is one, but either bike still weighs almost exactly 35 lbs, which I think is reasonable. You can "lock-out" the ICS if you want, as well. To do so, you replace the two freewheels on the intermediate bottom bracket with a pair of fixed gears, thereby "locking" the two cranks together as with a traditional tandem. You still get the advantage of the smaller chainrings and 4-way front shifting. You can switch back and forth between ICS and fixed for the price of the time needed to exchange the cogs...about 20-30 minutes (with practice), I'd guess. According to the builder in Colorado (a great guy, by the way), he very rarely has to send out the parts to do this. Most teams like the ICS better than fixed, according to him.
Disadvantages? Well, that middle bottom bracket with the two single-speed freewheels on one side and four cogs on the other is more complicated than a normal tandem. I can foresee that a strong pair of experienced adults that are more evenly matched than me and my various stokers would not need some of the benefits I find so attractive, but for me, it's just the ticket.
By the way, I've found the Large-Small da Vinci sizing to be rather flexible. My usual stokers are my children at 13, 11, and 8 years old now. They all started at 10, 8, and 7 (youngest had to grow just a bit to fit; he was too short when we first got the tandem). They're currently 5'3", 4'8", and 3'10" tall respectively. They all fit on the bike fine, though I have to remove the shock-post and run a different saddle all the way down for the youngest. The 13-year-old daughter is nice to ride with because of the time we spend together. Where else can an old guy spend so many hours with his teenage daughter? She's not all that strong and doesn't like to push very hard, though she doesn't mind longer 60+ mile rides if we take enough rest stops along the way. If the speed ever gets above about 24-25mph (usually on the down-hills) she starts calling for me to apply the brakes. A speed demon she's not.
 The 11-year-old boy, on the other hand, is much faster both on the flats and especially the downhills. He doesn't talk much, but likes to put his helmet down and hammer. Our average speed is about 1-2mph higher than with the girl. He tells me "Faster, Dad, faster!!," on every downhill. His longest ride is a metric century (62.5 miles) and he was very tired at the end.
The 8-year-old is only just barely big enough to reach the pedals. He's a real fireplug up hills, though; I think his strength-to-weight ratio is higher than the other two. When he stands up on the pedals, I can really feel the turbo-boost kick in. His longest outing is 45 miles so far--he still talks about that ride and wants to do hills when we go out. A real chip off the old block, if I do say so myself.
My two adult stokers have been my wife (5'2") for a few rides and a blind gal (5'7" but heavier than I am) whom I took for a couple or three rides last summer. Neither of these women are experienced cyclists by any stretch of the imagination, but we were easily up and riding on the tandem with virtually no issues. The daVinci ICS makes this especially easy.
I can't say enough good things about the ICS system, especially if the captain is much more experienced than the stoker, as is the case with me. It allows me to ride the tandem almost as I would a single bike, without any of the worries about dragging the stokers legs (as was previously mentioned), concerns about coordination of coasting periods, or even being effected when the stoker wants to stand up and coast for a butt-break. Starting out is particularly easy with no whacked shins for either rider...ever. I ordered the new bike with daVinci's cool three-hole stoker cranks (no extra charge, by the way). They makes a big difference, as they allow the stoker to have either 130, 150, or 170mm crank lengths just by moving the pedals from hole to hole. Because I tend to run a rather high cadence (usually from 90-110 rpm) I used to hear constant requests from the back seat to slow the feet down when on our older tandem (with fixed 170mm stoker cranks). Well, by using the 150mm option (where I normally have the stoker pedals mounted), it allows the stoker to run the same cadence as I but at a lower overall foot speed--no more complaints. Furthermore, I am able to use the 130mm super-short option with my youngest. This made all the difference in allowing him to fit the bike well.
Over time, as the stokers get more used to the faster cadence of the captain, you can simply move the pedals out to a more normal 170 mm length.
In our case, I'm about to try the 170mm with my daughter, though my wife (as infrequently as she rides) will likely prefer the 150mm forever. Since both boys are not long-of-leg yet, they'll stay at 150mm and 130mm for some time, I imagine. When a growth spurt hits, it's so easy to change to a different hole.
Our bike was "custom" ordered from da Vinci last spring, but with standard Large-Small sizing. We picked the exact color we wanted and I was able to spec every component. The front cockpit fits me exactly the same as my best-fitting single bike. I can move right from the one to the other without feeling even the slightest difference in fit.
This was important to me, though some captains don't mind (some even prefer) a different fit. Our frame was still made by hand by the same fellows that build da Vinci "custom" bikes; it's a pretty small shop. The biggest advantage of a custom builder would be for custom tube choices if you're an unusually light or very heavy team as well as the obvious custom sizing if needed, most especially for a longer top-tube in the rear cockpit. This can make a world of difference for stokers experienced on single-bikes. Because all of my stokers are small, the 28.3" rear top tube of the daVinci is fine.
I wanted a 57-58cm captain's top tube with a rear seat tube in the sub-45cm range. Their stock sizing fit this just fine so I didn't have to pay the custom size up-charge. I do have two different seatposts and attached saddles that I swap (15-second job) depending on who rides. I run the shock-post in the middle of it's height range for my daughter and wife and run it all the way down for my oldest boy, but I replace the post and seat for a set with very low profile for the littlest stoker.
Oh, and by the way, if you're set on another custom builder, daVinci does sell the jackshaft assembly separately, with a choice of steel, aluminum, or titanium shells to fit whatever frame material you prefer. Check out da Vinci Tandems for further info. However, I would not hesitate to recommend daVinci themselves for the frame. They know their product best and are an absolutely top-notch outfit. In fact, I know their painter does work for a number of other frame builders and I believe they do contract frame work as well, though I could be mistaken. By the way, I've got an IRD 10-speed 12-28 mounted on the new da Vinci. It's the "10-speed Elite Road Conversion Cassette" type that allows for Campy spacing on a Shimano-compatible freehub. This is in conjunction with a 9-speed SRAM chain, as I have not found any 10-speed chains long enough for the da Vinci (which uses 124 links) and didn't want to purchase two and splice. I'm leery of the strength of a spliced chain. I suppose I could use two master links, but haven't gone to the trouble yet.
The only problem we've had is that two of the spacers between the cogs were too thin for the 9-speed chain. This caused the chain to rub on the next largest cog at times and ghost-shift on to it under load on occasion. I firmly believe this is caused by the 9-speed chain and has nothing to do with the cassette itself. I solved it by replacing the two spacers with slightly thicker ones. The new spacers were thicker by .05 mm (yes, that's 1/2 of 1/10 of a millimeter). Not very much difference in thickness, I know, but it's enough that we've not had a single problem in the 3400 miles we've put on the bike.
I share some folks concerns about carrier-mounted cogs, which most high-end cassettes use to save weight. However, I believe that is most relevant on tandems using the larger rear cog sizes (like 32 or 34) and with strong full-sized stokers...especially off-road. Our cassette has a maximum of 28 teeth, we ride on the road exclusively, and my largest regular stoker just barely tips 90 pounds. Needless to say, we're not a powerhouse team. If this is a concern, you can use the Comp versions of the IRD; they don't use carriers for the larger cogs.
Be aware that daVinci's ICS will not "make" a team faster in and of itself. Fast teams are those with two strong riders who cooperate well with each other; the ICS's advantages lie in those times when the two of you purposely do not want to cooperate, like when one wants to take a break from pedaling and the other does not. Or when one rider is screwing around getting a cleat back in the pedal and you still need to get across the intersection. This happens to us all the time.
On the other hand, I do not believe that the ICS will slow down a strong coordinated team either (other than the pound or so weight penalty the jackshaft imposes). The ICS really shines in those circumstances like mine (small kids and/or non-cyclist spouse). If we didn't have a daVinci, I'm sure we wouldn't ride at all. The single bike is plenty fun, but the tandem is at least twice as much fun.
And yes, there's a real temptation for the weaker rider (usually the
stoker) to allow the stronger rider (usually the captain) to rickshaw them about. I can attest to this mightily as my kids have learned just how fast they have to pedal to keep the jackshaft's freewheel pawls from ratcheting (which I could easily hear), but to not really add much to the propulsion effort. The only complaint I have about the whole rickshaw issue is when we're riding with friends. For example, they usually cruise at about 15-16mph over a 50-60 mile relatively flat ride. On a single bike, I have no problem with 18-19mph in the front pulling them all. But on the tandem, with one of the kids on the back, I really struggle to keep a steady 14-15mph. It's close enough to the speed of our friends; we can almost hang, but not quite. We get very tired of pulling into every rest stop just as they all are ready to take off again, but I guess it doesn't bother my stoker kids enough to get them to crank just a bit harder.
On the other hand, there are no kids on these rides other than my stokers and we do get to spend an awful lot of time talking just between the two of us. I guess in the long run, I don't even mind playing the rickshaw driver all that much. We're out and having fun together, we enjoy the nature, and I get one hell of a workout, which is what I wanted all along...
Tuesday, August 14, 2007
Tippin' the Saddle
.jpg) I've mentioned before that I wasn't entirely satisfied with the stock saddle angle on the nifty leather Vespa GTV250ie seat. I felt that the front of the saddle didn't give enough support while braking; my weight would naturally shift forward and I tended to slide off the front of the seat unless I braced my feet against the leg shield. I decided that something had to be done. Here's a shot of the stock angle. Notice the nose is slightly lower than the tail and that the hinge under the nose cannot be seen.
I've mentioned before that I wasn't entirely satisfied with the stock saddle angle on the nifty leather Vespa GTV250ie seat. I felt that the front of the saddle didn't give enough support while braking; my weight would naturally shift forward and I tended to slide off the front of the seat unless I braced my feet against the leg shield. I decided that something had to be done. Here's a shot of the stock angle. Notice the nose is slightly lower than the tail and that the hinge under the nose cannot be seen..jpg)
In these two photos, you can see the four silver bolts that hold the saddle to it's plastic frame-plate. In the second shot, the lower right bolt has already been removed. These bolts require a 4mm Allen wrench (hex key). Once the bolts are removed, the saddle and it's rear chrome-plastic supports can easily be lifted off. Keep in mind that the rear bolts should be reinstalled without .jpg) spacers or modification, unless you also want to raise the rear of the saddle. This might be the case, if you've got longer legs, but wasn't what I was personally after.
spacers or modification, unless you also want to raise the rear of the saddle. This might be the case, if you've got longer legs, but wasn't what I was personally after.
I decided that it would be a simple matter to install a pair of spacers under the nose of the saddle along with the necessary longer bolts. .jpg) Here's a photo of the original bolts (the short one to the far right) along with 50mm and 40mm length potential replacements. Specifically, these are all 6mm in diameter with 1mm thread pitch, by the way. I wasn't sure which would give me a comfortable angle, and not wanting to return to the hardware store, I bought both sizes; you can never have too many bolts in the spair-parts stock, ya' know. As it turns out, the 40mm worked best; the spacers needed to support the 50mm bolts raised the nose of the saddle too much. I'll go into some details on that a bit later.
Here's a photo of the original bolts (the short one to the far right) along with 50mm and 40mm length potential replacements. Specifically, these are all 6mm in diameter with 1mm thread pitch, by the way. I wasn't sure which would give me a comfortable angle, and not wanting to return to the hardware store, I bought both sizes; you can never have too many bolts in the spair-parts stock, ya' know. As it turns out, the 40mm worked best; the spacers needed to support the 50mm bolts raised the nose of the saddle too much. I'll go into some details on that a bit later..jpg) Here's a photo of the 1/2" outside diameter x 3/4" long nylon spacers (those of you with good eyes will notice that there's actually one 1/2" spacer and one 1/4" spacer together) and three 3/4" washers I used. The lowest washer lies next to the head of the bolt, just as on the original setup. The other two washers sandwich the spacers and sit between the saddle itself and the plastic frame/pet-carrier lid. The re-installation of the saddle with the longer bolts and spacers required one more hand than God gave me; I enlisted the help of my oldest boy to hold the saddle frame steady while I positioned all the loose pieces.
Here's a photo of the 1/2" outside diameter x 3/4" long nylon spacers (those of you with good eyes will notice that there's actually one 1/2" spacer and one 1/4" spacer together) and three 3/4" washers I used. The lowest washer lies next to the head of the bolt, just as on the original setup. The other two washers sandwich the spacers and sit between the saddle itself and the plastic frame/pet-carrier lid. The re-installation of the saddle with the longer bolts and spacers required one more hand than God gave me; I enlisted the help of my oldest boy to hold the saddle frame steady while I positioned all the loose pieces..jpg) Once the bolts were tightened and the frame/carrier lid closed, the saddle now has a definitely higher nose. Notice how the front hinge is easily seen under the bottom of the saddle now. At first, I installed the 50mm bolts and appropriate 1" of spacers. That turned out to be a bit much. Yes, the front of the saddle was raised nicely, but so was the middle portion, where my thighs sit. I found it uncomfortable--the constant pressure on my thighs, that is. I felt like I was sitting on a bench with my butt hanging slightly off the back. Not pleasant.
Once the bolts were tightened and the frame/carrier lid closed, the saddle now has a definitely higher nose. Notice how the front hinge is easily seen under the bottom of the saddle now. At first, I installed the 50mm bolts and appropriate 1" of spacers. That turned out to be a bit much. Yes, the front of the saddle was raised nicely, but so was the middle portion, where my thighs sit. I found it uncomfortable--the constant pressure on my thighs, that is. I felt like I was sitting on a bench with my butt hanging slightly off the back. Not pleasant.
A week went by and I grew sure that I needed less tilt. I again had the boy hold the saddle frame while I removed 1/4" of spacer and slid in the 40mm bolts. The resulting tilt was ever-so-slightly less, but seems to make all the difference.
After riding this setup for six weeks now, I can report it's a vast improvement over both the stock angle as well as my first attempt with it's too-high angle. I no longer slide forward on the saddle, nor is the pressure on my thighs uncomfortable.
The GTV saddle's angle has now reached a happy equilibrium.
Labels:
Scooters
![]()